Broiler vs Skillet: Mastering Spicy Blistered Green Beans for Irresistible Flavor
Tired of mundane vegetable side dishes? Imagine vibrant green beans, kissed by intense heat, their skins perfectly blistered and tender-crisp, then tossed in a fiery, fragrant oil infused with garlic and chili. This isn't just a dream; it's the reality of **spicy blistered green beans with garlic**, a dish so incredibly simple yet profoundly delicious, it might just become your new obsession. Forget plain steamed or boiled beans; blistering them under a broiler or in a hot skillet unlocks a depth of flavor and texture that transforms this humble vegetable into a show-stopping side. This article delves into the two primary methods for achieving these irresistible beans – the lightning-fast broiler and the control-oriented skillet – helping you choose the best technique for your kitchen and your cravings. We'll explore the nuances of each, share expert tips, and unveil how to infuse them with that essential spicy garlic punch that makes them truly unforgettable. Prepare to never look at green beans the same way again!The Allure of Blistered Green Beans: Why This Method Wins
What exactly makes "blistered" green beans so captivating? It’s a remarkable textural and flavor transformation. When fresh green beans are exposed to high, direct heat, their skins rapidly char and bubble, creating small, flavorful blisters. This process achieves several magical things:- Enhanced Sweetness: The intense heat caramelizes the natural sugars within the beans, bringing out a sweeter, more profound flavor than traditional cooking methods.
- Irresistible Texture: You get the best of both worlds – a slightly smoky, crisp-chewy exterior with a tender, vibrant interior. It’s a far cry from soggy or stringy.
- Speed and Simplicity: Whether you opt for the broiler or skillet, these beans cook remarkably fast, often in under 15 minutes from start to finish. This makes them perfect for busy weeknights yet elegant enough for holiday tables.
- Flavor Absorption: The lightly charred surface acts like a sponge, readily absorbing the vibrant flavors of the accompanying garlic, chili, and other seasonings.
Broiler Bliss: The Fast Track to Spicy Blistered Green Beans with Garlic
If speed is your priority and you love a good char, the broiler is your best friend for achieving perfectly blistered green beans. This method is incredibly efficient, often taking as little as 5 minutes of direct cooking time, making it one of the fastest ways to prepare vegetables. The secret to broiler success lies in its intense, direct overhead heat. This high heat mimics deep-frying in its ability to quickly crisp and char the surface of the beans, but with significantly less oil and effort. The result is a delightful interplay of smoky bitterness and inherent sweetness, a testament to the Maillard reaction at its finest.How to Master the Broiler Method
1. Preparation is Key: Begin with fresh green beans. Wash them thoroughly and snap or trim off the tough stem ends. Pat them completely dry; excess moisture will steam rather than blister. 2. Lightly Toss: In a bowl, toss the dried green beans with just a tablespoon or two of olive oil, a pinch of salt, and freshly ground black pepper. The oil helps conduct heat and encourages blistering without making them greasy. 3. Single Layer: Arrange the beans in a single layer on a baking sheet. Do not overcrowd the pan, as this will lead to steaming instead of charring. Use two baking sheets if necessary. 4. Broil with Vigilance: Position your oven rack about 4-6 inches from the broiler element. Preheat your broiler to high. Once hot, slide the baking sheet in. Broil for 2-3 minutes, then carefully pull out the tray, toss or flip the beans, and return to the broiler for another 2-3 minutes.Pro Tip: Keep a close eye on them! Broilers can be unpredictable, and the difference between perfectly blistered and burnt can be mere seconds. Stay glued to the oven until they reach your desired level of char.
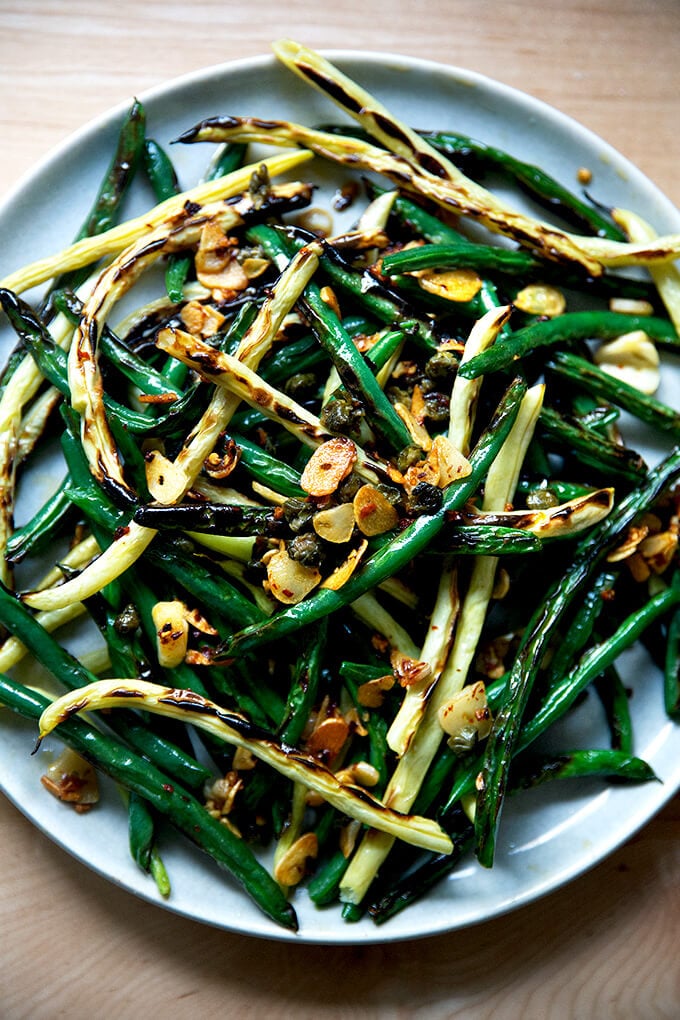
5. The Spicy Garlic Infusion: While your beans are blistering, prepare the star of the show – the spicy, garlicky, caper-infused oil. In a small, cold skillet, combine 2-3 tablespoons of olive oil with minced fresh garlic, a teaspoon of crushed red pepper flakes (or more if you dare!), and a tablespoon of drained capers.Expert Insight: Starting the oil, garlic, and spices in a cold pan is crucial. This gently infuses the oil as it heats, preventing the garlic from burning and becoming bitter. Heat slowly over medium-low until the garlic is fragrant and just beginning to turn golden, then remove from heat.
6. Combine and Serve: As soon as the beans emerge from the broiler, pile them onto a serving platter and immediately pour the warm, spicy garlic oil over them. Toss gently to coat. The aroma alone is enough to make you salivate! The intense heat of the beans will further bloom the flavors of the infused oil, creating an irresistible medley of textures and tastes. This method, popularized by sources like Alexandra's Kitchen, creates an unbelievably delicious and quick dish that tastes far more complex than its preparation suggests. The hint of salty caper in the oil adds a sophisticated touch, perfectly complementing the fiery garlic and charred beans.Sizzling Skillet Secrets: Crafting Crunchy Spicy Blistered Green Beans
While the broiler offers unparalleled speed, the skillet method provides a different kind of control and allows for a slightly different textural profile in your **spicy blistered green beans with garlic**. This approach often involves a brief blanching step followed by searing, resulting in beans that are consistently tender-crisp on the inside with beautiful brown bits and a satisfying crunch on the outside. The skillet method is ideal for those who prefer to keep their eyes on the prize directly and enjoy the process of caramelizing ingredients on the stovetop. It also allows for more nuanced flavor development with the browned garlic and infused oil.Step-by-Step Skillet Method for Blistered Perfection
1. Blanch for Best Results (Optional but Recommended): For consistently tender-crisp beans, briefly blanch them first. Bring a pot of salted water to a rolling boil. Add your trimmed fresh green beans and cook for 4-6 minutes, depending on your desired level of tenderness. Immediately drain them using a colander. This step ensures the beans are cooked through before they hit the hot skillet, preventing them from being raw in the center while the exterior blisters.Ingredient Tip: While fresh green beans are highly recommended for their vibrant flavor and crisp texture, frozen can work in a pinch. Just ensure they are fully thawed and patted dry before cooking. Avoid canned green beans for this recipe; their texture is too soft to achieve true blistering. For a fancier touch, seek out "haricots verts" or French green beans, which are thinner and cook even faster.
2. Heat the Skillet: In a large, heavy-bottomed skillet (cast iron works wonderfully), heat 2-3 tablespoons of olive oil (or butter for a richer flavor) over medium-high heat until shimmering. 3. Infuse the Garlic: Once the oil is hot, reduce the heat slightly to medium. Add your grated or finely minced fresh garlic to the pan. Stir constantly for about 30 seconds to a minute.Crucial Warning: Do not allow the garlic to burn! Burnt garlic turns acrid and bitter. You're looking for a fragrant, light golden color.
4. Sear the Beans: Increase the heat back to medium-high. Add the blanched (or raw, if skipping blanching) green beans to the skillet in a single layer. Stir occasionally, allowing the beans to make good contact with the hot pan. Cook for approximately 5-7 minutes, or until they develop those signature blisters and browned bits to your liking. The caramelization of these "brown bits" contributes significantly to the dish's depth of flavor, offering a delightful nutty nuance.Expert Tip: If you're skipping the blanching step, you might need an extra minute or two of cooking time, and ensure your heat isn't so high that the outside burns before the inside cooks. Covering the pan for a minute or two initially can help if using raw beans, creating a steamy environment that softens them slightly before they blister.
Elevating Your Spicy Blistered Green Beans with Garlic
The beauty of **spicy blistered green beans with garlic** lies not only in its simplicity but also in its incredible versatility. Once you've mastered the basic technique, you can easily customize the flavors to suit any palate or occasion.Flavor Boosters & Twists
Beyond the classic garlic, chili, and capers, consider these additions to take your beans to the next level:- Acidity: A squeeze of fresh lemon juice or a splash of rice vinegar at the end brightens the entire dish and cuts through the richness.
- Umami Depth: For a more complex, savory profile, add a tablespoon of miso paste (dissolved in a tiny bit of water) or a dash of soy sauce during the last minute of cooking.
- Herbs: Fresh parsley, cilantro, or basil, finely chopped and tossed in at the very end, add a burst of freshness.
- Nuts for Crunch: Toasted slivered almonds, pistachios, or pine nuts sprinkled over the top provide a delightful textural contrast and nutty flavor.
- Sweetness: A drizzle of honey or maple syrup can balance the heat and char beautifully.
- Other Veggies: Thinly sliced shallots, cherry tomatoes, or even roasted red peppers can be added to the pan during the last few minutes for extra color and flavor.
- Spice Variations: While red pepper flakes are standard, experiment with a pinch of smoked paprika, a dash of sriracha, or even finely diced fresh chilies for different heat profiles.
For more creative ideas to amplify the texture and flavor, explore Crunchy & Spicy: The Ultimate Blistered Green Bean Side Dish.
Serving Suggestions
These versatile beans pair beautifully with almost anything. They make an excellent companion to:- Proteins: Roasted chicken, grilled salmon, seared steak, air-fried turkey breast, or even simple pan-fried tofu.
- Italian Dishes: Chicken Parmesan, Italian quesadillas, or alongside a classic pasta dish.
- Holiday Meals: Their elegant appearance and unique flavor make them a standout addition to Thanksgiving, Christmas, or Easter spreads.
- Everyday Dinners: Simple enough for a quick weeknight meal, they elevate even the most basic main course.
